Sunday, August 31, 2008

Daring Bakers - Eclairs

This month's Daring Baker's Challenge was Eclairs. I'd never made eclairs before mainly because I was scared of the making the Pâte á Choux. I think I always assumed it was hard to make & a very delicate process. It actually ended up being much easier than I though & I was quite happy with the results.
eclairs
The recipe we used was from Chocolate Desserts by Pierre Hermé. I used half of the recipe because I didn't really need 20 - 24 eclairs. The full recipe called for 5 eggs. I added the first two & then added the third a little at a time until I felt the dough was the right consistency, I ended up being about 3 T of the last egg.

Pierre Hermé’s Cream Puff Dough

1/4 c whole milk
1/4 c water

4 T unsalted butter, cut into 4 pieces

1/8 t sugar

1/8 t salt

1/2 c all-purpose flour

3 large eggs, at room temperature


1) In a heavy bottomed medium saucepan, bring the milk, water, butter, sugar and salt to the
boil.

2) Once the mixture is at a rolling boil, add all of the flour at once, reduce the heat to medium
and start to stir the mixture vigorously with a wooden spoon. The dough comes together very
quickly. Do not worry if a slight crust forms at the bottom of the pan, it’s supposed to. You 
need to carry on stirring for a further 2-3 minutes to dry the dough. After this time the dough
 will be very soft and smooth.


3) Transfer the dough into a bowl of a mixer fitted with the paddle attachment, or using your
 handmixer or if you still have the energy, continue by hand. Add the eggs one at a time, 
beating after each egg has been added to incorporate it into the dough. 
You will notice that after you have added the first egg, the dough will separate, once again do
 not worry. As you keep working the dough, it will come back all together again. Beat the third egg & add it a tablespoon at a time until the dough is thick and shiny and when lifted falls back into the bowl in a ribbon.


4) The dough should be still warm. It is now ready to be used for the éclairs

This half recipe made me twelve 3-inch long eclairs & four puffs.

Once the dough was ready I piped it on to a baking sheet covered with a silicone mat. I used the coupler on my piping bag without a tip to do the piping. It wasn't as big as what was called for so I had smaller eclairs. Then I put the sheet into the freezer & let the piped shapes freeze.
eclairs
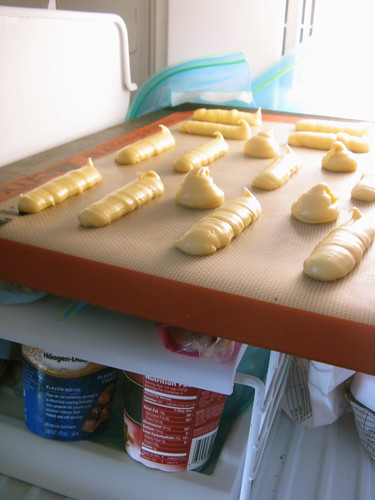
Once they were frozen I put them in a freezer bag to use later. When it came time to bake the eclairs I just grabbed as many as I wanted from the bag to cook up. This is great because you can make up a whole batch of the dough, pipe it & keep it in the freezer to use whenever you want over a month.

I cooked up three different batches. There was a lot of different thoughts on the Daring Baker's forum about cooking the dough, different temperatures, times, oven door closed, oven door ajar, etc... I ended up going with Alton Brown's temperatures & times. I used the Joy of Cooking's suggestion about cooling in a an open oven. All my batches cooked up beautifully.

Baking the Eclairs

Preheat oven to 425 F with two racks in it dividing the oven into thirds. Place the frozen pâte á choux shapes on a baking sheet covered with a silicone pad. Place a pan with about a cup of water in it on the bottom rack on the oven. Put the baking sheet with the dough on the top rack. Bake for 10 minutes. Turn the oven down to 350 F and rotate the baking sheet. Bake another 10 minutes. The dough should be puffed up & brown. Turn off the oven & remove the pan with the water. Use the tip of a knife to poke a small hole in each puff. Leave the tray of cooked puffs in the oven with the door ajar until cool. I used a wooden spoon to hold the door ajar. Store the cooled puffs in an airtight container until ready to use.
eclairs

We were allowed to change either the chocolate glaze or the chocolate filling for our eclairs. I decided to keep the chocolate glaze but do a vanilla pastry cream for my first batch.

Vanilla Pastry Cream

1 c + 2 T milk
2 egg yolks
1/3 c sugar
2 T cornstarch
2 T flour
1 T vanilla

Boil 1 cup of the milk in a saucepan. While it is heating whisk together the egg yolks, sugar & remaining milk. Whisk in the flour & cornstarch until combined. Slowly pour in the hot milk while whisking. Return the mixture to the saucepan & stir until it is boiling & thick. Turn the heat down to low & stir another 2 minutes until smooth. Put in a bowl & cover with plastic wrap. The wrap needs to touch the surface of the cream to prevent a skin from forming. Allow to cool to room temperature & then refrigerate for at least 2 hours. It can be refrigerated overnight. Once cold it pipes beautifully.

For my second batch I made a coffee flavored pastry cream & substituted 1 T brewed espresso for the vanilla. It was so good! We liked it better than the plain vanilla.

Makes enough to fill 8 small eclairs

Chocolate Glaze


4 oz chocolate, finely chopped
1/4 c + 2 T cream
1T butter

Bring butter & cream to a boil over medium heat. Turn heat to low & add the chocolate, stir until completely melted. Allow the sauce to cool a little before frosting & it will thicken up. I store it in a tupperware container in the fridge & microwave it for 20 seconds on high when I need to use it.

Assembling the eclairs

For my first batch of eclairs I used a small knife to cut the tops off the puffs. Then I piped in the pastry cream, put the top back on & added the glaze. This was nice but A little hard to eat.

For my second batch, I used poked a wooden skewer into the puffs & moved it around to make sure the inside of each puff was completely hollow. Then using my piping bag & a small star tip I piped the cream into the center of each puff. I found that I had to pipe into both ends of each puff to get the eclairs filled completely. These came out great though & were easier to eat.
eclairs
I stored my assembled eclairs in an airtight container in the refrigerator before serving. This allowed the chocolate glaze to harden.

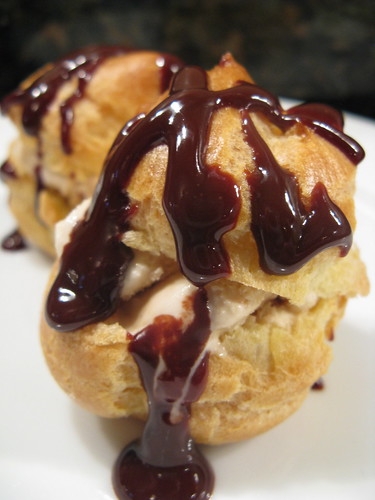
I also cooked up the puff sized pastries I made. They took the exact same amount of cooking time. I cut them in half & served them with ice cream in the middle & chocolate sauce on top, yummy!
eclairs
Thanks to Tony Tahhan & MeetaK for this month's challenge. It was a lot of fun & I'll make these again!

Saturday, August 30, 2008

Chicken with Cucumber & Dill

The idea of sautéing cucumbers in butter to serve hot might sound a little odd to you, I know Matt was very dubious when I explained this dish to him, but it is really quite a tasty surprise. Once cooked the cucumbers have a slight sweetness & their texture becomes a lot like that of a cooked apple. Dill is of course the classic herb to use with cucumber. The lemon juice is really important to add vibrancy to this dish so don't skimp on it. I like to serve it over a little jasmine rice.
Chicken with Cucumbers & Dill
If like us you have a lot of cucumbers right now this is a perfect & unusual way to use one up.

Chicken with Cucumber & Dill
(adapted from Cooking Class Chicken Cookbook)

2 boneless, skinless chicken breasts
salt
pepper
2 T unsalted butter
1 cucumber
1/4 t dried dill
juice of one lemon

Season the chicken breasts with salt & pepper. Melt 1 T of the butter in a large skillet over medium heat. Add the chicken & cook for about 10 minutes or until cooked, flipping halfway through. Remove the chicken to a plate & tent to keep warm. Keep the skillet on the heat.

Peel the cucumber & halve it lengthwise then seed it. Now cut the halves into 1/4-inch slices. Melt the remaining 1 T of butter in the same skillet. Add the cucumbers & season with salt & pepper. Cook the cucumbers for about 2 minutes & then add the dill & lemon juice.

Return the chicken breasts to the pan as well as any juice that has accumulated on the plate. Cook for 2 more minutes or until the chicken is reheated.

Serve pouring any sauce in the pan over the chicken & cucumbers.

Serves 2 but is easily doubled for 4

Friday, August 29, 2008

You take the good, you take the bad...

If you've followed this blog at all you know that every week I post a new cupcake flavor. Well, this week's cupcake was such a disappointment I almost didn't share it but then I thought I can't only show you when things work out, you all need to share in my failures too.
Chocolate Covered Cherry Cupcake
First of all let's talk about my poor choice in piping design with this frosting. Yes, I know what it looks like. We now affectionately call this cupcake "the poopcake." No, that was not my vision.

Now, let's talk about flavor. This was supposed to be a chocolate covered cherry cupcake. I started with my favorite white cupcake recipe. I replaced most of the milk in the recipe with really good cherry preserves. I liked the idea of big chunks of cherries in the cake. Then on a whim I threw in some chocolate chips. The cupcakes took a lot longer to cook than normal, like 5 minutes longer & still some felt a little wetter than I like. The cake did have a nice subtle cherry flavor but they were like little heavy muffins not nice fluffy cupcakes.

So then I whipped up some chocolate buttercream. The buttercream actually came together though is seemed to have a lot of air bubbles when I piped it (am I over beating it?). Did my oh so lovely piping job & tried a finished cupcake. Well, I might as well been eating nothing but chocolate because that is all you tasted, sigh. The cherry flavor was completely hidden by the frosting.

So, I'll not be sharing a cupcake recipe with you this week as this one is headed back to the drawing board. The cake recipe needs to be lightened & the flavors intensified. As for the frosting, I think a nice ganache might be better suited here. Luckily, Matt still thinks they are good enough to eat.

Watermelon Salad

Yes, I am jumping on the watermelon salad bandwagon. How can I help it? I keep seeing these beautiful salads online & then I get a nice little watermelon from my CSA.
watermelon salad
I made my salad with what was on hand, olive oil from the pantry, goat cheese leftover from a tart & basil from the garden. I was a little worried this would be strange but let me tell you, we loved it! The tartness of the goat cheese & slight pepper flavor of the basil just balance the sweetness of the watermelon perfectly. I have another watermelon on the way & will be awful tempted to repeat this.

My salad was inspired by this one at Eating Out Loud. Yeah, mine is quite rustic compared to Allen's beautiful presentation.

Thursday, August 28, 2008

What's in CSA box #9

What's in CSA box #8
Oh my, this is the box of summer's bounty!

Watermelon
- I'm thinking of trying to make a watermelon sorbet
Sweet Corn - This will get grilled up Saturday night for a bbq with friends
Green Peppers - I have no idea since I don't really like them. Ideas? I heard at the fair if you deep fry them they don't taste like peppers anymore.
Cucumbers - 4 giant ones & I still have one left from the last box. I'll do some refrigerator pickles.
Squash - One little squash that will either go in a stir-fry or pasta
Tomatoes - those two are salad bound
Radish Greens - Apparently these are really good sautéed up with some bacon, but then what isn't?
Salad Mix
Broccoli
Italia Peppers - I ended up loving these in stir-fry last week so this week we'll try sausages & peppers
Garlic
Raspberries - I think I'll do raspberry tarts
Japanese Eggplant - This will go in a stir-fry
Petite Green Beans - Some will get stir-fried but most just steamed
Tomatilla Salsa Kit - This contains tomatillas, a jalapeno, a small onion & cilantro. I love the fact the farm puts things like this together for us.
Zucchini - Maybe on a pizza this week.
Cipollini Onions - Matt wants some of these creamed like I did the leeks
Red Beets - To me these are best roasted with some garlic & olive oil.

I'll do a wrap up of what I did with boxes 8 & 9 together since I didn't have a week between the two like usual. The amount of vegetables here is really making me think that getting a box every other week is they way we should continue for two of us.

Wednesday, August 27, 2008

Faux Fried Chicken & Biscuits

I've noticed lately that whenever there is one of those commercials for fast food chicken & biscuits comes on TV Matt makes a comment about how good they look. So, I decided to make him my own version at home.
faux fried chicken & biscuits
I figured I could make them a little healthier by baking the chicken instead of frying. I used the same basic technique that I've done in the past for faux fried chicken but this time I used boneless chicken breasts & changed the seasoning up a bit.

Faux Fried Chicken

2 boneless, skinless chicken breasts
1/2 c buttermilk
6 T fine bread crumbs
2 T grated Parmesan
1 t ancho chile powder
1 t grated lemon zest
salt & pepper

The night or morning before you plan on making the chicken, pound it with a mallet until its an even thickness. Cut the chicken breasts in half & put in plastic bag with the buttermilk.

Preheat the oven to 400 F.

Mix the bread crumbs, Parmesan, ancho, lemon zest & salt & pepper together in a shallow bowl. Spray a baking sheet with cooking spray. Take the chicken pieces out of the buttermilk & dip them in the bread crumbs, pressing in on to coat. Put the chicken on the baking sheet & bake for 10 minutes. Then turn the chicken over & allow to bake for 10 - 15 more minutes or until the chicken is cooked through.

Biscuits
(adapted from Small-Batch Baking)

1 c all-purpose flour
1 1/2 t baking powder
1/2 t salt
4 T unsalted butter, cold
7 T - 8 T heavy cream
melted butter

Preheat oven to 450 F.
Shift the flour, baking powder & salt together into a bowl. Cut the butter into small pieces (if the butter warms up put it back in the refrigerator for a few minutes. Add the butter to the flour & use two knives to cut it in until the butter is in small pea-sized pieces. Sprinkle 7 T of cream over the dough & use a fork to toss it until a dough begins to form. Add the remaining cream if the dough isn't coming together. Use your hands to bring the dough together in the bowl quickly, just 5 to 6 kneads. Put the dough on a floured surface & shape into a 5-inch square about 1/2-inch thick. Cut into four 2 1/2" x 2 1/2" squares.
Brush a little melted butter on a baking sheet & place the biscuits on the butter. Bake for 10 - 12 minutes until risen & golden brown. Brush a little melted butter on top of the hot biscuits.

Slice the biscuits in half horizontally. Place a piece of chicken between the slices of biscuit.

Makes 4 small sandwiches

This was my first time making biscuits from scratch. The recipe originally called for self-rising flour which I didn't have so I added the baking powder & salt which is supposed to make an appropriate substitute. I had hoped the biscuits would have risen a little higher but I'm not sure if the problem was this substitution or because I handled the dough too much. They did turn out really flaky & tasted great though.

Matt like his sandwiches with a little mustard on them. I thought they were perfect with just the buttery biscuit & the chicken.

Recipes to Rival - Tamale Challenge

This is my first month as a member of Recipes to Rival which is sort of the savory version of Daring Bakers. I enjoy the Daring Bakers but a girl can't live on cake alone.
making tamales
This month's hosts were Debyi of Healthy Vegan Kitchen & Lori of Lip Smacking Goodness. They challenged us with tamales, something I've never made before & kind of always assumed were really hard to do. It turns out I was so wrong. Once you have the filling & the masa paste made they really go together quite quickly.

I used the Basic Tamale Recipe we were given for the masa paste though I used chicken stock instead of water of vegetables stock because its what I had. I also didn't bother to heat my stock because it was at room temperature, I had read that you have to be careful not to add stock that was too hot or it would cook the masa flour. I ended up making a half batch of the paste (actually I made two 1/4 batches two different days) which made about 24 tamales all together.
IMG_6099
(Tamale with Corn & Cheese Filling)

We were allowed to pick any fillings we wanted for a tamales. I love the sweet corn tamales that I get locally at La Loma & since sweet corn is in season I knew I wanted to make those. Matt, on the other hand, likes a pork filling with a little spice. So we decided to go with two fillings.
Making Tamales
(Tamale with pork filling)

The corn filling is super simple with the only cooking required being to cook the corn. Other than that its just some chopping & you are ready to start filling.
Making Tamales
Corn & Cheese Tamale Filling
from azcentral.com

1 c corn kernels (I cooked one large ear of corn & then cut the kernels off it)
1/3 c onion, chopped
1 jalapeno, seeded & chopped
1 1/2 c grated Monterey Jack
2 T heavy cream

Mix everything together. Use right away or refrigerate for 1 day.

Makes enough for 12 tamales

The red chile & shredded pork filling took a little more time because the pork needs to braise for about an hour & a half. The red chile sauce was so fragrant & tasty.

Red Chile & Shredded Pork Tamale Filling
adapted from azcentral.com

Red Chile Sauce

2 1/2 oz whole dried ancho chiles
boiling water to cover chiles
1/2 t ground oregano
1 T onion, chopped
1 clove garlic, peeled
1 c chicken broth
1/2 T vegetable oil
1 t flour
1/4 t salt

Remove the stems & seeds from the dried chiles while rinsing them under cold water. Place the chiles on a skillet that has been preheated over medium-high heat. Toast the chiles for about a minute until they are aromatic. Place them in a bowl & cover them with boiling water & soak for about 10 minutes. Drain the chiles setting aside the liquid for later use.

Place the chiles, oregano, garlic clove, onion & stock in a blender, process until smooth. Add more liquid if its too thick.

Heat the vegetable oil in a saucepan over medium-high heat. Add the flour & stir constantly until golden. Add the chile paste & salt then reduce the heat to low. Stir often & cook for about 10 minutes.

Pork

1 T olive oil
1 - 1 1/4 lb boneless pork butt (we actually used country style pork ribs & they worked perfectly)
1 garlic clove, peeled
2 bay leaves
10 peppercorns

In a large pan with a lid heat the olive oil over medium-high. Add the meat & sear on all sides.
Making Tamales
Add the water used to soak the chiles for the sauce. Add more water if needed until the meat is almost but not quite covered. Add the whole garlic clove, bay leaves & peppercorns. Bring to a boil. Reduce heat & cover. Allow to cook for about 1 1/2 hours until the meat is extremely tender & can be easily shredded.
Making Tamales
Allow the meat to cool & shred it with your hands or a fork. Mix in as much chile sauce as you'd like. We didn't want the filling too runny so we used about half the sauce in the meat.
Making Tamales
I added another 1/4 cup of the sauce to the masa paste when I was making the pork tamales & it was fabulous.
Making Tamales
(Tamales with red chile sauce in the masa paste)

Fills about 12 - 15 tamales

Making the Tamales

Before you can start making the tamales you have to soak your corn husks. We soaked ours in hot water for about 1/2 hour. Then we rinsed them to make sure there was no corn silk left. We kept them in a pan of warm water while we worked.
Making Tamales
(I found a pan lid helped keep the husks in the water while they soaked)

Putting together the tamales wasn't that hard once we got the hang of it. Using a knife or your fingers (my preferred method) you spread some masa paste on the the corn husk starting on the wide edge. We spread it about 2/3 down the length of the husk & left about an inch on the edge. Matt did this right in the palm of his hand, I found it easier to do on the counter. Then we added filling down the center of the masa paste. Finally the whole thing was rolled from the side with the masa to the inch that was left empty & the bottom was folded up over the seam.
Making Tamales
We steamed our tamales vertically but putting them in a steamer basket inside a large pasta pot. I put a ball of tin foil in the center to help them stand up since they didn't quite fill the basket. We let them steam for about 45 minutes, refilling the water about halfway through. Then we had finished tamales for dinner.
Making Tamales
(This pot wasn't tall enough & I ended up switching to a bigger pasta pot)

They turned out pretty good & the batch I made the second day was better. I think I was going a little heavy on the masa & a little light on the fillings for the first batch. Matt really liked them with some green salsa on top & I like them just plain.
Making Tamales
We freeze them in the corn husks in packages of two. When we want to eat them we just open the bag for a vent & then microwave them on high for 3 minutes. They come out perfectly steamed & ready to eat.

I think both Matt & I are really happy we got to try our hand at making these. We have a lot of corn husks & masa flour left so I'm sure we'll be doing this again.

Tuesday, August 26, 2008

A Steakhouse Dinner at Home

Matt decided to treat us to some really good steaks this week & had our butcher cut us two beautiful beef tenderloin steaks. He treated them very simply with just a little salt, pepper & olive oil & then wrapped them in some good bacon before grilling them to a medium-rare perfection.
#238 - Who needs a steakhouse?
I was my job to prepare an appropriate side dish. I decided to do a take on the creamed spinach you often see on the menu at steak houses, only I would cream the leaks & yukina savoy we got in our last CSA box. If you don't have yukina savoy you can use any other dark leafy green. I personally had never heard of it before receiving it from the farm now I wish I could get it all the time. Its a lot like spinach but it doesn't have the bitterness that spinach sometimes does.
Creamed Leks & Yukina Savoy

Creamed Leeks & Greens
inspired by the Harmony Valley Farm newsletter

1 c sliced leeks, white & light green parts only, well washed
1/2 T butter
salt
pepper
1/3 c heavy cream
1 bunch (about 2 c packed) dark leafy greens (spinach, swiss chard, yukina savoy, etc), stems removed & washed
Parmesan cheese

Preheat the oven to 400 F. Melt the butter over medium heat in a large oven-safe sauté pan. Add the leeks & season them with salt & pepper. Cook the leeks until just tender. Pour in the cream & bring to a simmer. Add the greens to the pan & stir until wilted & the cream has reduced some. Once the greens are wilted spread them out to cover the bottom of the pan. Grate Parmesan cheese over the top. Place in the oven & allow to bake until the cheese is melted, about 3 - 5 minutes.

Serves 2

Steakhouse dinner at home
What a way to make a Monday night special! The steaks were so tender it was unbelievable, they needed no sauce, no marinate, not even a compound butter. The leeks & greens were creamy & flavorful. We really love the flavor the leeks added to the sautéd greens.

Monday, August 25, 2008

Mini Cinnamon Rolls

In honor of the MN State Fair starting last week, Zoë Francois, one of the authors of Artisan Bread in Five Minutes a Day: The Discovery That Revolutionizes Home Baking (a book that many of us have come to love), posted a how-to for mini cinnamon rolls on-a-stick. Since I had some buttermilk dough in the refrigerator (I do most of the time) I figured it would be a perfect Sunday morning breakfast treat.
Mini melon & mini rolls
(I serve my mini cinnamon rolls with the mini melon we got in the CSA box, does that make this a mini breakfast?)

Having the dough ready made these tasty little treats come together in no time at all. I started with 6-oz of buttermilk bread dough (the same dough I use for hamburger buns) which I rolled out to a 1/4-inch rectangle that was 4 inches on the longest side. Then I sprinkled 2 T of brown sugar & 1/T of cinnamon on top leaving a half inch on the edge.
cinnamon roll making
I rolled that up into a log & cut it into eight 1/2-inch slices.
cinnamon roll log
Each slice went into a non-stick mini muffin tin. Zoë didn't say anything about letting them rise but I figured an hour couldn't hurt them. Here they are nice & puffy & ready for the oven.
Risen & ready for the oven
I baked them at 350 F for 15 minutes. I removed them to the plate right away (she warns to do this before the caramel hardens). For an icing I just mixed together a little powdered sugar & milk.
Mini cinnamon rolls
The bread is quite different than the cinnamon rolls you get at a bakery. That bread is typically really soft where this has a little crust on the outside. The flavor was amazing & these little two-biters really hit the spot. We decided to leave them off the stick since we had had our fill of food on-a-stick at the fair. I'm so glad Zoë shared the technique!

Weekly Menu - 8/24 - 8/29/08

MN sweet corn
The local sweet corn is plentiful & cheap right now (twenty-five cents an ear) so I picked up 10 ears this weekend to put away for winter. I boiled them for 10 minutes, let them cool & then cut off the kernels. I was able to get 6 cups of the sweetest seasonal corn put away for this winters soup, stews & pot pies. Its so good I think I might need to go get some more.
sweet corn for the freezer

On to this week's Menu Planning Monday...

Grilled Beef Tenderloin with creamy leeks & yukina savoy

Chicken with Cucumber & Dill

Pork Souvlaki served with Zucchini Fritters

Homemade pasta with vegetables

Faux Fried Chicken & Biscuits with Watermelon Salad - Nikki over at Nik Snacks has been making me crave biscuits!

This week's cupcake will be Chocolate Covered Cheery.

Also this week will be the reveal for my first Recipes to Rival Challenge, some cinnamon rolls, another CSA box and who knows what else.

Sunday, August 24, 2008

If it's on a stick...eat it!

Our state fair is a great state fair. Ever since we decided to move to Minnesota I've been telling Matt about the state fair & how I couldn't wait to take him there this summer, the animals, the crop art, the people watching & the food, especially the food!
A sea of people
Our fair is known for the amount of different food items with 261 different food vendors & 69 of those feature food on-a-stick, the ultimate in convenience food. We're not just talking corn dogs (or pronto pups as they're called here), we're talking about things like spaghetti & meatballs or pizza on-a-stick. Matt & I thought we would share his first culinary adventure at the fair with all of you...
Yum Breakfast!
For most people the first stop when you arrive at the fair in the morning is Tom Thumb Donuts for a bag of sixteen mini donuts. They're warm, fresh from the fryer & coated in cinnamon sugar. Some people claim the Tom Thumb stand by the Old Mill Ride is the best.
Mac & Cheese on a Stick
Next stop was Axel's (yes, THAT Axel) to try two different foods on-a-stick. First, we tried the deep-fried mac & cheese on-a-stick. They were quite salty which made them taste a lot like cheese curds, not a bad thing at all. The inside was so soft & creamy.
Tater Tots on a Stick
Then it was the tater tots on-a-stick, hash brown potatoes, cheddar cheese, bacon, sour cream & chives served with a spicy dipping sauce. Matt really liked these.
Deep Fried Pickle Chips
Next was deep-fried pickle chips with ranch dressing. Oh, were these amazing, probably the best thing we had all day! Who knew hot pickles could be so good.
Ruben Dog on a Stick
Then the thing Matt had been looking forward to most, rueben on-a-stick, a hot dog wrapped in sauerkraut then coated in rye breading & deep-fried served with a side of thousand island dressing. He said it was good but next time he'll try the corn beef & cabbage on-a-stick.
Deep Fried Snickers on a Stick
Time for a sweet & a deep-fried Snickers on-a-stick. Really yummy but really messy & a little dangerous with that hot caramel.
Big Fat Bacon on a Stick
Oh yeah, bring on the pork or more specifically the Big Fat Bacon on-a-stick. One-third pound of hand-cut bacon fried & caramelized with maple syrup. This booth was so busy they couldn't make the bacon fast enough! You could have the bacon with two different barbecue sauces or mustard.
Sparkling Apple Cider Float
By now we needed a little palate cleanser so we went for the sparkling apple cider float. Very refreshing with a scoop of vanilla ice cream.
Finally the Cheese Curds
Finally, the king of the Minnesota fair foods, the deep-fried cheese curds. Salty, melty goodness!
There was so much more we wanted to try but our stomach were yelling surrender. I wanted to try a Pig Licker, bacon coated in chocolate & sprinkled with salt, but the demand was so high that Famous Dave's BBQ couldn't keep up. There were about 50 people waiting for the next batch while I was there.
Hotdish on a Stick
Next year I really need to leave room for the hotdish on-a-stick!
You can see more pictures of our day at the Fair here.
Thanks to Matt for being such a good sport & letting me take pictures of him eating all day!

Saturday, August 23, 2008

Hickory Smoked Ribs with Corn & Bacon Fritters

One of the nice things about Matt working at home is that he can be working & slow smoking some fabulous pork ribs for our dinner at the same time.
Hickory Smoked Ribs
These ribs were so amazing! Juicy, tender & smoky. These ribs followed most of the steps for my Dad's Memphis Ribs with a few changes. Matt rubbed the ribs with adobo chile powder & some yellow mustard. He filled the smoker box with wet hickory chips & put it over direct heat. Once the chips started smoking the ribs went in the grill over indirect heat for about 1 1/2 hours. During that time Matt refilled the smoker box two more time making sure to keep the smoke going. After that first 1 1/2 hours he put the ribs in a tin foil pouch with half a beer. This time they went over direct heat on the grill for 1 hour. Next the ribs came out of the pouch & were brush with Wee Willy's Barbecue Sauce & cooked over direct heat for 1/2 hour more. Oh, man the smell of these cooking was so good.
Hickory Smoked Ribs with Corn & Bacon Fritters
In our book there is only one thing better than pork & that's more pork so I whipped up some Corn & Bacon Fritters. I used the same recipe as for the Carrot Fritters substituting cooked sweet corn I got at the Framer's Market for the carrots. I also added 5 sliced of bacon that had been chopped, cooked & drained on a paper towel. The flavor was that combination of salty & sweet that I love so much & the fritters had a nice crunch from the corn.
These didn't hold together quite as well as the carrot fritters because of the difference in texture . I think they actually could have used a little more batter so next time I may try adding some milk & a little more flour.
Hickory Smoked Ribs with Corn & Bacon Fritters
What a perfect summer meal!

Friday, August 22, 2008

Dark Chocolate Grasshopper Cucpakes

Before you get worried, there are no grasshoppers in this cupcake. Matt asked me to do a cupcake this week based on a grasshopper, the cocktail, pie or cake. The one thing he specified was the mint part had to be really green.
Dark Chocolate Grasshopper Cupcake
This cupcake features my favorite dark chocolate cake, a creamy mint filling & dark chocolate buttercream. If you've followed my baking exploits at all you know of my off & on success with buttercream. Strangely enough, I've had better luck with the harder Italian & Swiss buttercreams than the relatively easy American buttercream. This time though I think I've got the American buttercream down. The frosting came out creamy yet stiff enough to pipe (not that my piping skills are anything to write home about.). As Matt was licking the beaters (he likes cupcake baking day) he said this version was what he thinks of when he thinks of buttercream so I'll be sticking with it.

I used mint extract to flavor my filling because I didn't want to buy a whole bottle of creme de menthe just for 5 cupcakes though it would be more traditional. I was afraid the mint wouldn't be strong enough to stand up the the dark chocolate but it really came through & the flavors blended together perfectly.
Dark Chocolate Grasshopper Cupcake
(I think that filling is green enough!)

Dark Chocolate Grasshopper Cupcake


Dark Chocolate Cupcake

1/4 c unsalted butter
1/8 c Hershey's Special Dark Cocoa Powder
3 T water
1/2 c granulated sugar
2 T well beaten egg
1/8 c plain yogurt or buttermilk
1/2 T vanilla
1/2 c all-purpose flour
1/8 t baking soda
1/4 t baking powder
pinch of salt

Preheat oven to 350 F. Prepare muffin tins.
Melt butter in a large heavy saucepan over moderately low heat, then whisk in cocoa. Add water and whisk until smooth. Remove from heat. Whisk in separately sugar, egg, yogurt, and vanilla. Sift flour, baking soda, baking powder, and salt into the cocoa mixture and whisk until just combined (it will be a little bit lumpy).

Fill muffin tins to about 2/3 full for rounded cupcakes. Bake for 20 minutes until a skewer or toothpick comes out clean. It's a moist cake, so don't worry if a few crumbs stick to your tester.
Allow cupcakes to cool.

Makes 4 - 6 cupcakes. (I got 5)

Mint Cream Filling


1/4 c heavy cream
1/2 t confectioners sugar
1/2 t mint extract (or creme de menthe)
1/2 t cold water
1/8 t unflavored gelatin
food coloring (I used neon green with a dash of neon blue)

Whip the cream, sugar & mint extract together just until soft peaks form. Set aside.
Mix the water & gelatin together in a small bowl and microwave briefly, about 10-20 seconds, until the gelatin is dissolved. Allow to cool slightly but not get hard. Add the gelatin & food coloring to the cream & continue whipping until stiff peaks are formed. Keep in the refrigerator until ready to use.

Makes enough to fill 6 cupcakes.

Dark Chocolate Buttercream

2 T shortening
2 T unsalted butter
1/4 t vanilla
1 c powdered sugar, sifted
3 T Hersey's Special Dark Cocoa Powder
1 T milk
3/4 T light corn syrup

Cream the shortening, butter & vanilla together. Sifted in the powdered sugar & cocoa, beat until well blended. Beat in the milk & corn syrup until light & fluffy.

Makes enough to frost 5 - 6 cupcakes.

Assembly


Dark Chocolate Grasshopper Cupcake
After the cupcakes have cooled completely, fill a piping bag with a large star tip attached with the mint cream filling. Insert the tip into the center of the cupcake about 3/4 - 1 inch. Squeeze the bag to fill the cupcake with filling as you slowly pull the bag up & out. I like to let the cupcakes chill a few minutes in the refrigerator before frosting to allow the filling to set a little.

Frost with the dark chocolate buttercream & garnish with a fresh mint leaf.
Related Posts with Thumbnails

Get Email Updates!

Enter your email address:

Delivered by FeedBurner

Measurement Abbreviations

T = Tablespoon
t = teaspoon
c = cup
lb = pound
oz - ounce

Labels

Blog Archive

Contributors

Blog Directory for Minneapolis, Minnesota